Pages

Tuesday 25 March 2014

Final Major Project...

The Language Of Flowers

Welcome to my FMP! My FMP is based on the book ' The Language of Flowers'; in this project I will explore many representations of flowers. The idea for this project came from pure observation of my surroundings. I am inspired daily from the colours and intricacy of nature's beauty. I will also research the meanings to a variety of flowers and the spiritual and emotional aspect of this topic as well as the healing properties they have to offer. I will also explore the biology and fascinating makeup of flowers, to support this I will research artists and designers such as Ernst Haeckel and Christopher Kane. Throughout my project I will explore floral pattern and designs by researching into embroidered flowers, pressed flowers and photography. I will research many interpretations of flowers ranging from real life drawings of flowers to modern stylised floral design as mainly seen on many wallpaper and fabric prints. I will research into many artists and designers to support this such as William Morris who I look at as one of the most influential and iconic designers/ artist in history. For my modern contemporary designers I will look at designers/ artist such as Cath Kidston/ Liberty prints whose name has travelled far among textile print design. I will compare and contrast these decades of printed textiles to see how far we have developed textile design today. As part of our FMP I have to research into business cards to support my exhibition at the end of the project, I will design and produce a corporate business card and a creative business card.

Techniques I will explore:
  • Knitting
  • Needle felt/ wet felt
  • Batik
  • Screen print process
  • Embroidery
  • Collage 
For my final piece I will produce a wall hanging which will include many processes that I have used throughout my two years at college, this will be based on floral prints. I will also attempt to make needle felted cushions if I have time. 
The book 'The Language Of  Flowers' that my project is based on.

Tuesday 11 March 2014

Live Project Working With 'MOO' Evaluation!

In this project we were asked to work with a client, in this case we were working with a company called ‘MOO’ which is based in Barnsley. This project tested both my time keeping skills and creativity. The brief was to produce a number of samples that were based on invertebrate sea creatures for spring/ summer 2014. We also had to make sure it was monochrome with one splash of colour as this is what was asked of us. These samples were to show ‘MOO’ potential printed material that they could use on an Avant Garde garment that they were designing. This project was a competition which made it all the more competitive and challenging. At the start of every project research needs to be done about the clients you are working for and the brief to get background knowledge to produce an excellent project. At the end of the project we were asked to present our work to ‘MOO’ so they could have the deciding vote. So here is how my project went. My research consisted of primary, secondary and drawing from observation. I took photos of sea creatures from the sea life centre, I also took photos of items in the ‘MOO’ boutique to get a feel of there company. I collected images of sea creatures and images and information of various artists and designers that relate to sea creatures or sea colours. From these images I drew numerous sketches throughout my sketchbook mainly of designer’s sea inspired clothing collections. I developed this research by creating mood boards; this was a collection of images that I collaged onto A3 sheets of paper showing pattern and colour from invertebrate sea creatures that inspired me. From this I then developed my visual sheets which I took pattern and colour and started to develop it further by using different media to recreate the sea creature patterns. Then finally I did my development sheets which I finalised my chosen pattern to print onto fabric. All this sheet work was mainly based on shells because I liked the texture and shape, I then made it my own by adding intricate patterns within the design. The elements I took forward into my design (tracing) were the colours and shell patterns. I really liked how they looked on the sheet so I decided to recreate the exact pattern onto fabric including making the Procion dye the same colour as the sheet work. When ‘MOO’ came to have a look at my sheet work they picked out patterns that they liked which was the shell pattern. This helped me in deciding what my tracing was going to look like. When it came to the colour they said it was entirely up to me what colour I think would look best. In a way this made it difficult for me when it came to dying my fabric because I didn’t have a specific colour of what they wanted therefore I just had to guess. My research showed me that turquoise was in this summer so I produced mainly shades of turquoise dyed samples. To show my experimentation I also dyed some fabric in other colours such as purples, pinks, and oranges. This meant they would have a wide variety of samples to choose from depending on what they were looking for. The original brief was to produce monochrome samples with a splash of colour, however I decided to take a risk and do most of my samples with a strong background colour with a black print on top. The risk paid off because they ended up really liking my samples the way they were. I took this risk because to me Avant Garde means outstanding, unique and never done before, therefore to make it outstanding I wanted it to first stand out with both the unique pattern and stunning colour and I believe it worked out well. I found it difficult with the constraints the client gave me because they wanted an Avant Garde garment design, they ended up choosing a simple beautiful print with really soft colours which was the opposite to my samples, I found this frustrating because when I researched Avant Garde designs there was nothing subtle or simple about them so I struggled making sense of the brief. The experimentation I did throughout this project was printing on various materials from heavy viscose satin to habotai silk. This showed how it would work on different materials to get different delicate effects. I liked how strong and outstanding it looked on heavy viscose satin because the dyed background was really striking and metallic, but on material such as devore silk it looked really delicate and simple. I also experimented with puff binder on a few of the samples. I really liked this technique because it gave it a 3D effect and with my design it looked really creative. I also used devore paste which burns away the fibres on the material revealing the pattern, however I didn’t appreciate the full effect because I used too much devore paste which was slightly disappointing because the detail didn’t show up correctly. A problem I encountered was that my screen wasn’t exposed properly meaning that a little bit of the pattern was missing on the print, but because the print was so intricate anyway it wasn’t that noticeable. Another problem was that my screens didn’t line up properly due to my fabric shrinking so I had to just try my best. I also used puff binder and realised that it wasn’t suitable for a garment because when washed and pressed it goes flat or even burns. I experimented by layering up puff binder on a small piece of dyed fabric, this looked really good because you could see random patterns against a blue background. I found it easiest printing on material such as calico and cotton because it was firm material and gave a nice result. When I printed on material such as muslin and heavy silk it was really difficult because the print kept moving even though the fabric was taped down and when the print was revealed I think I used too much pigment ink. The results on the lighter materials weren’t as reliable or effective as the other samples. When I printed on a piece of calico the screen must have had too much excess pigment on it because all the detail was blocked therefore I decided to print puff binder on top of it to cover my mistake and it turned out to be my favourite print. If I didn’t have any client constraints I don’t think I’d do anything differently because I produced so many samples, I think I produced every possible colour and material for them to choose from anyway, rather than sticking to just light fabrics. I would say I produced a wide variety of different coloured fabrics varying from light to heavy. The only thing I would change is maybe experimenting with white backgrounds and different coloured pigment rather that just black, the only reason I didn’t is because I think with a design like mine it needs to be printed black because of the intricate detail. I would also have liked to experiment with fabric manipulation just to see what it would look like, but due to time I couldn’t have fitted it in. My chosen designers such as Monique Lhluillier and Alberta Ferreti influenced my work because of the stunning colours they used specifically turquoise, however my inspiration for the intricate detailed shells design came from Avant Garde garments that I looked at. None in particular but as a whole I just noticed that the prints were bold and eccentric and the colours were vibrant and fun that is how I was inspired. I also loved how my chosen designer’s interpreted sea creatures in many different ways from elegant and simple to bold and bizarre clothing. I wanted my design to be in-between these two categories so that it could be wearable but as I have learned maybe my design isn’t what they were looking for as a garment. Deciding my final design was pretty easy because I knew from day one I wanted to do shells, and because of my individual artistic style I just combined shells and pattern together to produce my final print. I think reproducing my print onto a larger piece of fabric would probably be quite difficult because I didn’t create a repeat print, and the detail was so complicated that I couldn’t guarantee a perfect print each time. This was because I struggled with most of my A3 samples which wouldn’t have been suitable or perfect enough to feature on a dress garment. The processes I used throughout this project were screen print, puff binder and devore. The media I used were fine liners, gouache paint, procion dyes, brusho powder and fabric. I also used equipment such as the heat press, and the heat gun. The things that went well were my research, sheet work and dying my fabric. The things that went slightly wrong were lining up my screen, printing because it was faded due to the material such as heavy silk viscose and the screen not exposing properly. The things I would change for next time would be to allow more time to print and also I would request having two separate screens rather than having two on one screen because when I printed I had to let the whole screen dry. This meant in-between each print I didn’t really have anything to do because I couldn’t print my second screen. I think I managed my time well up until the printing stage because we only had one week to print and with everyone in the print room it was pretty hectic and stressful. I came in one day during the holidays to wash and press my fabric this was so I could get printing soon as possible but even that didn’t give me a lot of time left over to print. To solve this problem in future I would come in on my days off to get work done to a better standard, however I managed to produce a good amount of samples to present to ‘MOO’. When I presented my work to ‘MOO’ I felt quite confident in my work and they were very reassuring, but they obviously wanted something different. Therefore I didn’t end up winning. This process and interview gave me confidence for the future because I now feel I can present to any client. I would say that it has given me confidence even though it wasn’t what they were looking for. The owner of ‘MOO’ reassured me by saying it is great just the way it is and not to change it. This made me realise that I should never change my individuality and that the design world is purely down to personal preference. We were given a weekly diary to complete to see how we managed our time, if I’m perfectly honest I can’t say it made a difference to how I managed my time, it just made me aware that I had to fill in a diary. For my final project I will definitely use it as a time management plan because of limited time on our final project. Therefore I think it will really help me. I have learnt that it would be useful to take notice of the diary because I might have not been rushing as much as I did. It was quite scary working for someone outside of college because it was added pressure and I’m not really a competitive person, but I have learnt that if you want to win you have to do everything to get there. I have also realised that to get to where you want to be you sometimes have to change your style to suit a client, in this circumstance this wasn’t the case thankfully. I found it difficult because my individuality and style means more to me than just trying to please someone else, that is why the owner of ‘MOO’ comments meant a lot because I didn’t feel she was trying to steer me in anyway. It was definitely an experience because I now know that if my work is good enough for the design world, it will be recognised in the right design industry rather than fashion without me having to completely change my style. I am probably more suited to interior design. I’m aware that many artists and designers have gone down this road and it isn’t easy, it may have took many years but staying true to my own style means more to be than any competition, it was an interesting experience it just showed me how uncompetitive I am. The clients were really good to work with and very positive about my work and it definitely built my confidence. Overall I really enjoyed this project and I was pleased with the outcome. My strengths were my confidence and motivation; if I was to improve anything it would be to keep better time management and to be confident enough to see it more as a competition rather than just a project. I think I tried to forget about the competitive side because it would just have been added pressure and stress but in the real world I guess it would be something I’d have to learn if I wanted to be a top designer.

Saturday 8 March 2014

More Samples...

Black Cotton, screen print, plain puff binder, Q print Turquoise puff binder. I really like this sample because the puff binder looks really effective against the black, I had to use puff binder because we didn't have any white special pigment. The print is possibly too dark for a summer dress.

Cotton, Black SN-G pigment ink screen print, Q print Turquoise puff binder. I like this sample because it stands out against the white with a splash of colour, it goes perfectly with the monochrome colour scheme. However I put too much pigment on the screen so the detail didn't show up properly.

Medium Calico, Yellow Mx3R and Orange Mx2R (stripes) Procion dyed background, Black SN-G pigment ink background, plain puff binder, screen 2: Q print Black puff binder. Originally I was just going to keep this print black but the print went wrong so I decided to cover up the mistakes by printing puff binder over the top of it. This turned out to look really nice and summery. One problem I had with numerous samples was that my screens didn't line up properly due to my material shrinking. If this was chosen as the winning sample I would have to use just black pigment because puff binder wouldn't be suitable.

Cotton, Turquoise MxG and Red Mx5B Procion dyed background, Black SN-G pigment ink screen print, screen 2: Q print Black puff binder. At first I wasn't a fan of this shade of purple but when I printed on it it looked really nice and would look great on a summer dress, I would probably change the grey shells to black pigment because when I heated up the black puff binder it turned into grey. I found Cotton and Calico the easiest material to print onto because it stayed in place. Cotton would be the fabric that I would personally choose because it is light but reliable giving a great finish.

Cotton, Turquoise MxG 10ml and water 120ml Procion dyed background, Black SN-G pigment ink background, screen 2: Q print Black puff binder. I like this sample and it printed well but I think the shade of blue is slightly too pale and would only work for darker shades of skin colouring.

Cotton, Turquoise MxG Procion dyed background, Black SN-G pigment ink screen print, screen 2: plain puff binder. This printed really well and I love the overall effect with the white and black against the strong turquoise/blue this is one of my favourite samples.

Cotton, Blue Mx2G 50ml, Green Mx2B 15ml, water 100ml Procion dyed background, plain puff binder (experimental piece). This was just an experimental piece with layered screen prints of puff binder on an A5 sheet of dyed cotton, although I wouldn't use it to present I just wanted to experiment with pattern.

Medium Calico, Red Mx5B 35ml and Orange Mx2R 35ml Procion dyed background, Black SN-G pigment ink screen print, screen 2: plain puff binder. I love this print because the coral pink is perfect for summer and the puff binder looks really nice with the black, however I had problems lining up the screens correctly, meaning some of the shells overlap.

Cotton, Blue Mx2G 20ml, Turquoise MxG 40ml, Green Mx2B 15ml Procion dyed background, Black SN-G pigment ink screen print, plain puff binder. I like this sample because its a softer version of my bright blue turquoise sample, I think this is a better sample because its more subtle and not too bright, this was a successful print. Again some shells overlaped due to the material shrinking.

Medium Calico, Turquoise MxG + Red Mx5B 60ml, water 100ml Procion dyed background, Black SN-G pigment ink screen print. (1 screen). This print worked well against the deep purple colour but the Calico is slightly too heavy for a summer material, I wanted to just see one screen on this material and it worked well because it wasn't too busy. Overall with all my samples I think I did it to a good standard but one of my main problems was that the screen hadn't exposed properly. This meant some of the detail on the shells was missing which slightly let down the overall appearance. However I am happy with the results I printed.

My Screen Prints...

The first step was to buy my fabric, I had them cut to A3 size, this is the fabric I bought: Cotton, Heavy Viscose Satin, Devore Silk Viscose, Muslin, Medium Calico and Habotai Silk Heavy. I also used black light Satin, and black Cotton. I dyed most of my fabric in various colours of cold water dyes, once they naturally dried I put them on the heat press for 20 seconds to set the dye at 180 degrees. Then I rinsed them with warm water till it ran clear, this is to make sure the chemicals have all been washed away from the fabric. I dried the fabric again and placed it on the table, I put masking tape in each corners to prevent it from moving. I then placed my screen on top of the fabric. I dabbed black pigment ink at the top of the screen and firmly pulled down the ink using a squeegee. I did this a couple of times to reveal a print on my fabric. To prevent the screen from blocking I washed it with the water power jet and then placed it in the drying cupboard. Once my fabric print had dried I placed it on the heat press again for 20 seconds at the same temperature to set the pigment ink. I used other techniques such as Devore and Puff Binder. Devore is a paste that will only work on Devore material, it burns away the fibers to reveal a lace look pattern, I first screen printed the paste onto my material then let it dry naturally. This took quite a while but eventually it dried, so then I put it on the heat press and then rinsed all the yellow stain away with warm water. I then let it dry, dyed, pressed and washed it again. With puff binder I screen print it onto my material and then heated it up with a heat gun to puff up the paste, but don't put it on the heat press afterwards because the puffed up parts will go flat. Its important to wash your screens often as they can block quite easily. Here are my prints, I have used different techniques and two screens on some, so take a look! also take a look at this link so that you can try screen printing yourself.


Screen Printing For Beginners>>>Click here to learn how to master screen printing!


Health and Safety:

Wear gloves and apron to prevent skin irritation and skin staining. Keep work area clean and tidy to create the best print possible. Be careful when moving around with the dyes as there could be slippery surfaces which could cause spillages. Be careful when using the water power jet, as it can be quite powerful. Be spatially aware of other people. 

Pricing List:

Puff Binder 1 Pot = £15.00
Pigment each = £5.00
Procion each = £5.00
Habotai Silk Heavy, Green Mx2B Procion dyed background, Black SN-G pigment screen printing ink. (1 screen). This was a beautiful delicate material to work with but when I printed onto it it was really difficult because the fabric kept moving. Overall i'm not pleased with the result because the detail didn't show up properly due to too much pigment being pushed through the screen.

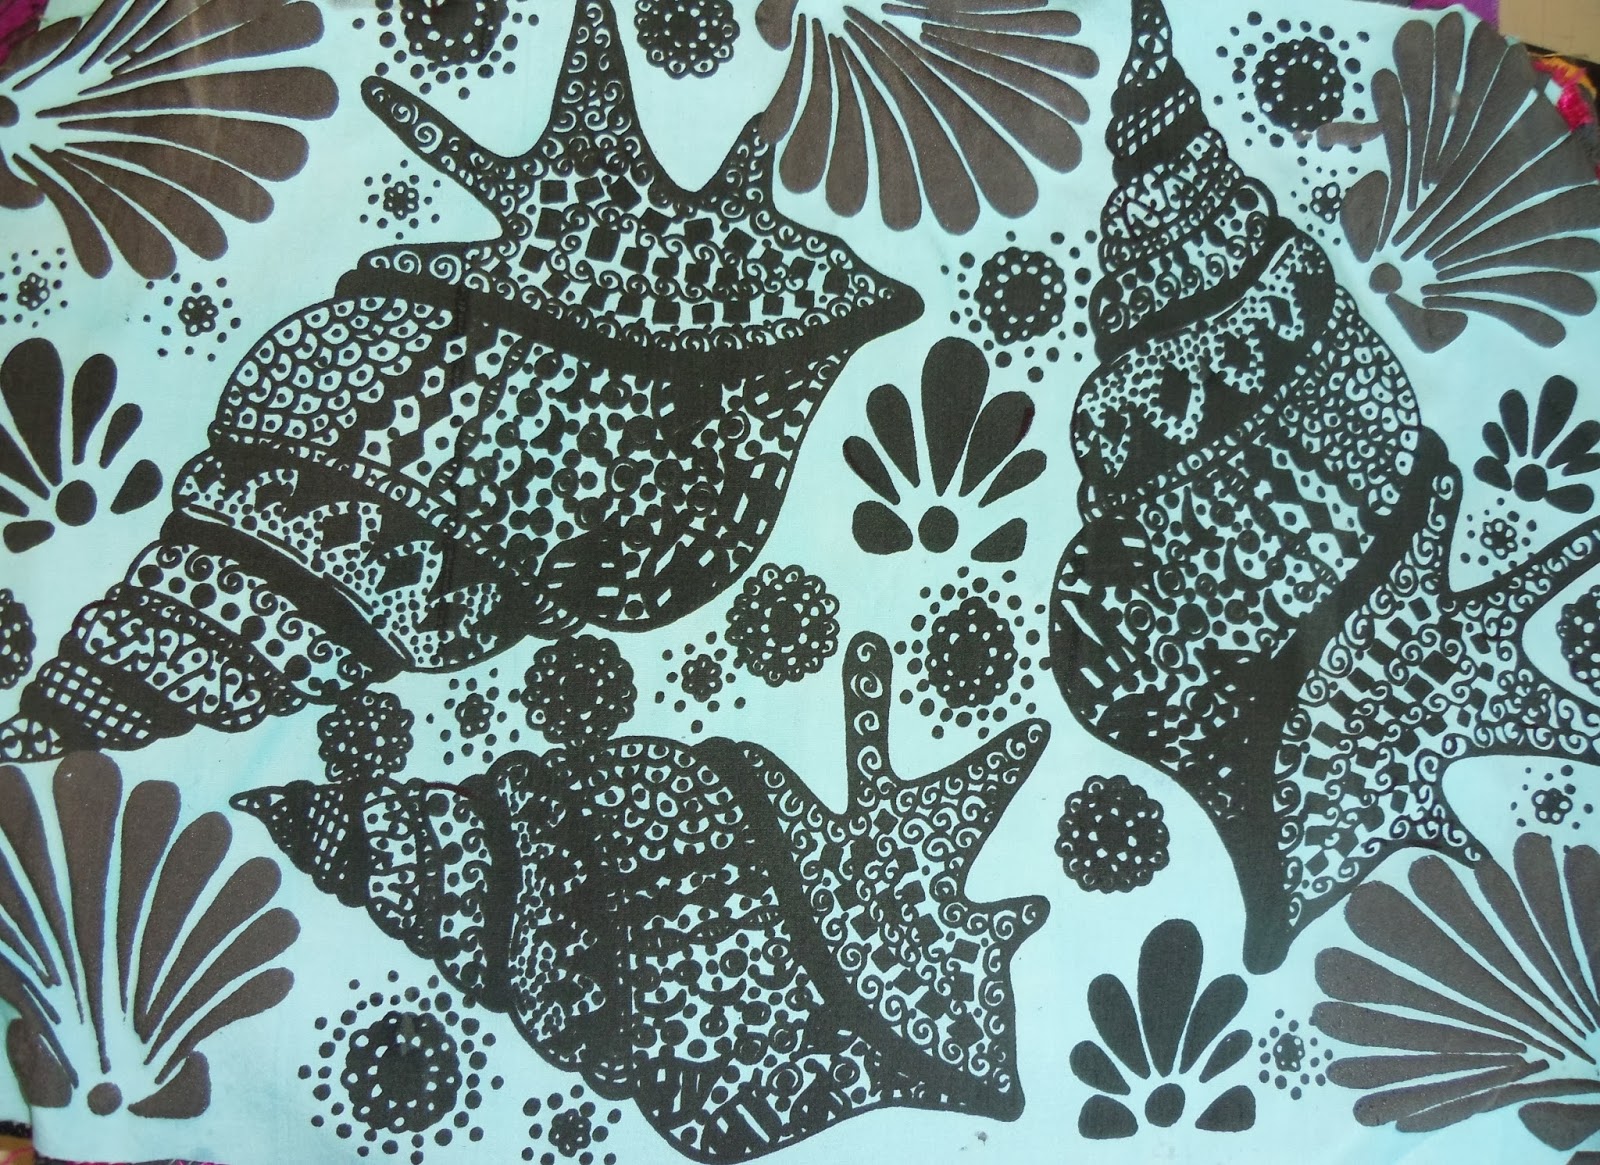
Muslin, Turquoise MxG 60ml and Green Mx2B 20ml Procion dyed background, Black SN-G pigment ink screen print. This material was really nice but more for a scarf rather than a dress because its quite transparent which also affects the quality of the print, however the colours work well together.

Devore Silk Viscose, Devore paste, Red Mx5B 35ml and Orange Mx2R 35ml. This was my least favorite sample because I put too much Devore paste onto the screen, so when the sample had been dried and finished, alot of the pattern was unrecognisable. Despite not working like I had hoped it still had a nice lace effect.

Heavy Viscose Satin, Red Mx5B Procion dyed background, Black SN-G pigment ink screen print, screen 2: Q print Black puff binder. I love this material and really looked forward for my design to be printed onto it but when I came to screen printing it onto my fabric it dried really faded which slightly disappointed me and the material is probably too heavy for summer. I really like the colour on the material because it gives a metallic effect. The puff binder works perfectly on the fabric but the pigment ink doesn't.

Heavy Viscose Satin, Turquoise MxG 60ml and Green Mx2B 20ml, Black SN-G pigment ink background, screen 2: Q print Black puff binder. Again the pigment faded on top of the material but the puff binder looked really good against the fabric. The colour was an experiment that I made using two different dyes, I think the color is ideal for this project and it was a risk experiment that worked out perfectly.

Scrap material, screen print, plain puff binder. (1 screen). Although I wont be able to use this fabric because its scrap material I just wanted to experiment on various materials and the puff binder was stunning against the green. It was a very simple process but yet very effective.

Black Light Satin (scrap material), screen print, puff binder. (1 screen). This was an experimental piece on scrap fabric, it looked really effective but as I applied heat to the puff binder the material started to shrivel and the sample got smaller and smaller bringing the patterns closer together. This in a way looked quite good but due to it shriveling it couldn't be used for a dress. Also with any puff binder appliance it would not be suitable for a dress because as soon as you wash it or heat it up it just burns and goes flat.


Tuesday 4 March 2014

Producing My Tracing...

Step 1: I decided I wanted to do two screens for two different colours, I had an A3 sheet of paper to draw onto. I started drawing my middle images first in pencil. My design is inspired by invertebrate sea creatures specifically shells. I used different thicknesses of lines to create texture. I decided just to keep it as an A3 image rather than a repeat image because it was slightly too difficult to do.

Step 2: I then went over to the light box and got another sheet of paper, I put my first drawings underneath the plain sheet of paper so that I could line up where I was going to put my second lot of images around the border. I had to do it on the light box because it shines light through the paper if you are wanting to trace images.

Step 3: Once I had drawn both set of images on each sheet I checked if they lined up perfectly. They were sightly off and a bit difficult to line up but it wasn't that noticeable.

Step 4: I went over all the pencil lines in black marker pen and filled in all the outlines with pattern to complete the design.

Step 5: The tracing design has to be in black so that when the screen is exposed it can pick up the block colour. I then photocopied the image onto tracing paper ready for the technician to expose it onto a screen. The image turned out to be slightly bigger than the tracing paper so I had to cut some more tracing paper and attach it to each side of the sheet and draw the missing bit onto it. I then cut out all the marks and blobs that I didn't want to show up on my screen, I used a craft knife to do this.

Health and Safety: Be careful when using a craft knife because its a very sharp tool, be extra careful when adding pressure to it because you can slip your finger and cut yourself. The technician has to expose the screen because the light box is far too bright and could be dangerous if you don't know what your doing.

Result: I'm pleased with my design and I did it fairly quick. My time keeping was good because I could really concentrate on my tracing.

How To Expose The Screen For Screen Printing<<<Click here to check out how to Expose a Screen!
Screen 1: I sketched out the outlines first using a pencil.

Screen 2: I then drew the border images and started to fill all the images using black marker pen. I used block colour.

Screen 1: For the center images I filled in the outlines with intricate detail.

Screen 1 complete!

Screen 2 complete!

Development Sheets...

Stage 3 in my development!

My final stage of my development was creating my development sheets. I combined all the patterns together and even introduced different colours just to see what it would look like. I've decided for my tracing I will combine colours and patterns from both my visual sheets and development sheets. I'm pleased with my development sheets because I feel I can now produce an effective outstanding design.
I created the background using yellow and orange brusho ink to create stripes. I then used a thin and thick marker pen to draw the detail, and a silver pen for the dots. I like this sheet because its full of pattern but I don't think the colour goes with the sea theme. This sheet would make an elegant print using a turquoise or teal background instead of yellow and orange.

I created the background using pale blue brusho ink. I then used pink and white paint for the dots and silver pen for the other dots. I used black paint and marker pens for the rest of the patterns. I think this sheet is too busy for a dress design but would be perfect for a cushion cover or a featured wallpaper.

Zoomed in image of my first development sheet showing the detail close up.

Visual Sheets...

Stage 2 in my development!

The next step was to develop my mood board sheets and create visually stunning sheets full of pattern and colour. As this project was monochrome with a splash of colour I started to use marine colours on my sheets. I used marine colours such as turquoise. I then drew simple shell outlines filled with intricate detail inside.
I created the background using berol pen and water to give it a purple wash. I then drew shells with pattern inside using a thin marker pen to create texture. I then decorated the page using pink nail polish polka dots, blue pen polka dots and glue for a glossy finish.


I dyed the background using cold water dye turquoise MxG. I then drew shells using marker pen and paint for the dots to look like 3D diamantes. This sheet is one of my favorites because I love the colour and I can definitely see it being used for a dress print.

Mood Boards...

Stage 1 in my development!

The first step to designing my print was to create mood boards. I used imagery and media that related to the sea and invertebrate sea creatures. I used plenty of colour and pattern that inspired my designs. I'm really pleased with my sheet work because there were so many stunning creatures to look at and the choice of media I used worked really well with the images. I also drew intricate patterns within outlines of shells and sea creatures.
I did a collage of invertebrate sea creatures in a creative way. I added polka dot nail polish to decorate the page and glue to give it a glossy finish.

I created the background using batik and prussian blue brusho ink. I then drew sea horses using marker pen. I then realised that a sea horse was a fish so I couldn't use it for my design. However I just kept it as an extra design sheet.

I created the background using batik and blue/ green brusho ink. I then collaged images onto the page and drew a nautilus shell in the middle using marker pen. I finished the page off using nail polish and glue.

I created the background using batik, purple and greeny blue brusho ink. When I held it up to the light it was like a stain glass window, this is because the wax had covered the whole page and soaked into it. This was unintended but worked out really good because it revealed my images more clearly. I drew patterned crabs and octopuses. I also used collaged images and white paint for the dots.

Inspired By Avant Garde Designs...

I started to look at various Avant Garde dress designs, most of them were creatively crazy but that's why I Really liked them, some were fun and some were Gothic but all inspired my research for this project. It made me think of loud prints and bizarre ideas, however I still wanted to keep my print elegant but showstopping at the same time. 
My Avant Garde dress design, I wanted it to look dramatic and quite Gothic, I also documented possible colours and material in my sketchbook.

Avant Garde research and ideas that inspired me.

Inspired by 'MOO'...

I started to research the company and looked into leather and cow prints, even though they don't use cow prints in there own designs I still researched it because it relates to cows and leather. I then drew some sketches of dress designs that incorporated leather and cow prints as part of my extended research.
I'd use embossed black leather for the skirt and screen printed material for the top bit of the dress.

I'd use lace for the arms and screen printed satin for the dress to create the cow prints.

Customer Profile Board...

As part of the project I created a customer board, this board was to represent a possible 'MOO' customer. Rather than choosing a celebrity I decided  to create my own made up person with a made up lifestyle. I called the customer Jessica Kiles, she has various jobs such as jewelry designer, vintage fashion designer and part time photographer, she is also a married woman and mother of a little girl named Lily. I made up this life because I wanted to show that this woman could be a 'MOO' customer. I would then base my ideas and designs as if I was designing for this potential customer. When I present my project to the owners of 'MOO' I will talk through this customer board and show them how my customer has influenced my designs. I will explain how my customer has an interest in bold prints when it comes to fashion, therefore my print will be bold and unique.

Inspired by shells...

I started looking into shells and looked at the texture, shape, pattern, and colour and decided that I wanted to base my final piece on shells. I looked at different images that included printed shells on a dress design. Here are some dresses I designed based on shells that also incorporate the elegance of mermaid costumes. I also did some dress print designs that could be made into a dress. I really like the simplicity of a shell and decided I wanted to give it my own unique twist by adding pattern. This is how I started developing my ideas.
Print idea 1: I used Red Mx5B cold water Procion dye, marker pen, and silver pen.

Print idea 2: I used watered down turquoise Brusho ink, marker pen, silver pen.
One of my shell/ mermaid dress designs done with a marker pen. Id use screen printed black shells on plain satin, with real shells for the corset with ruffled up chiffon for the arms, with added diamantes and jewels for the rest of the dress.

More Sketchbook Research...

Artist Research 

I then started looking at various artists and designers that inspire me. I looked into sea creature inspired designs and marine colours. Each designer had a unique collection of clothing to offer, they all used different textures and materials for there designs and it was amazing how each designer interpreted sea creatures into fashion. I looked at artists and designers such as Alberta Ferretti, Monique Lhuillier, Alexander McQueen, Kelly Bull, Sarah Burton, Arai, Mary Kantrazou, Versace, Iris Van Herpen, Roberto Cappuci, Ernst Haeckel, Zuhair Murad, Chanel and Elie Saab.

Check out this link to view one of my favourite designer's catwalk shows:

Monique Lhuillier Spring/Summer Collection 2013 <<<Click here


I did some quick sketches of the dresses that inspired me. I used water colour and pen to complete the design.


All these designs remind me of sea creatures such as coral and fish scales.


I love the ideas of these designs and how they represent marine life and the ocean.


I did an artist research sheet that included all the unique designs that inspired me. I also drew my own Avant Garde design.
Some designs are quite bizarre and some are quite elegant, however I find all deigns are unique and creative.